A well-maintained fence not only enhances the aesthetic appeal of your property but also provides security and privacy. Over time, however, fence posts can become damaged due to weather conditions, rot, or physical impact. Repairing a broken fence post is a critical maintenance task that, when done correctly, can prolong the life of your fence and save you from costly replacements. In this detailed guide, we will walk you through the steps to effectively repair a broken fence post.
Identifying the Cause of Damage
Before we begin the repair process, it is essential to determine the cause of the damage. Fence posts can break or become loose for various reasons:
- Rot and Decay: Wooden posts are particularly susceptible to rot, especially at the base where they contact the ground.
- Weather Conditions: Harsh weather, including strong winds and heavy snowfall, can weaken posts over time.
- Physical Impact: Accidental impacts from vehicles or heavy machinery can crack or break fence posts.
Understanding the cause of the damage helps in choosing the appropriate repair method and materials.
Materials and Tools Needed
For a successful repair, gather the following materials and tools:
- Replacement post (if the old one is beyond repair)
- Concrete mix or gravel
- Shovel and post hole digger
- Level
- Saw (for trimming the new post)
- Hammer and nails or screws
- Protective gear (gloves, safety glasses)
Step-by-Step Repair Process
1. Removing the Damaged Post
Assess the Extent of Damage
First, assess whether the entire post needs replacement or if only a portion is damaged. If the post is severely decayed or broken, it is best to replace it entirely.
Excavation
To remove the broken post, dig around the base using a shovel or post hole digger. If the post is set in concrete, you may need to break and remove the concrete. Be careful not to damage any surrounding fence panels during this process.
2. Preparing the New Post
Selecting a New Post
Choose a post of the same material and dimensions as the original. For wooden posts, consider using pressure-treated wood to resist rot and decay.
Trimming and Treating
Trim the new post to the desired height. Treat the base of the post with a wood preservative to extend its lifespan.
3. Setting the New Post
Positioning
Place the new post in the hole, ensuring it is centered. Use a level to check that the post is perfectly vertical. This step is crucial for the stability of your fence.
Backfilling
There are two primary methods for securing the post:
- Concrete: Mix concrete according to the manufacturer's instructions and pour it into the hole around the post. Allow it to set for at least 24 hours before reattaching the fence panels.
- Gravel: Alternatively, you can use gravel, which provides excellent drainage and reduces the risk of rot. Fill the hole with gravel, packing it down firmly as you go.
4. Reattaching Fence Panels
Once the post is securely in place, reattach the fence panels using nails or screws. Ensure that the panels are level and aligned correctly.
Preventative Measures
To prolong the life of your fence posts, consider the following preventative measures:
- Regular Inspections: Check your fence regularly for signs of damage or decay, especially after severe weather.
- Proper Installation: Ensure that posts are installed with adequate drainage to prevent water accumulation at the base.
- Use of Quality Materials: Opt for pressure-treated wood or metal posts to resist rot and corrosion.
Common Mistakes to Avoid
Incorrect Positioning
A common mistake is not ensuring the post is perfectly vertical. An angled post can compromise the structural integrity of the entire fence.
Improper Backfilling
Using inadequate or improper backfilling materials can lead to instability. Always use concrete or well-compacted gravel.
Neglecting Protective Treatments
For wooden posts, neglecting to apply a wood preservative can significantly reduce their lifespan. Always treat the base of the post to protect against moisture and insects.
Repairing a broken fence post is a manageable task that can greatly enhance the longevity and appearance of your fence. By following these detailed steps and taking preventative measures, you can ensure your fence remains sturdy and attractive for years to come.
Repairing a broken fence post is a common maintenance task for homeowners. Whether due to weathering, accidents, or age, a broken fence post can compromise the integrity of your entire fence if not addressed promptly and correctly. In this guide, we'll walk you through step-by-step on how to repair cracked fence posts, fix leaning fence posts without replacing them, and ensure your fence remains sturdy and functional.
Assessing the Damage: Identifying the Problem
Before diving into repairs, it's crucial to accurately assess the damage to your fence post. Common issues include cracks, rotting, and leaning. Each of these problems requires a specific approach to ensure a lasting repair. Inspect the affected fence post thoroughly to determine the extent of the damage.
How to Repair Cracked Fence Posts
Materials Needed:
- Wood filler or epoxy
- Sandpaper
- Protective gloves and goggles
- Clamps or braces
- Paint or stain (optional)
Step-by-Step Repair Process:
Prepare the Area: Start by cleaning the cracked area and removing any debris or loose wood fibers. Use sandpaper to smooth the edges of the crack for a better adhesive bond.
Apply the Filler: Depending on the severity of the crack, apply wood filler or epoxy into the crack using a putty knife. Ensure the filler reaches deep into the crack for a strong bond.
Allow to Cure: Let the filler cure completely as per the manufacturer's instructions. This usually involves leaving it untouched for several hours to ensure it hardens properly.
Sand and Finish: Once the filler is fully cured, use sandpaper to smooth out the patched area. If desired, apply paint or stain to match the color of the existing fence for a seamless finish.
Inspect and Maintain: Regularly inspect repaired areas for any signs of further damage. Perform maintenance tasks like reapplying paint or stain as needed to protect the repaired fence post from environmental wear.
Fixing a Leaning Fence Post Without Replacement
Materials Needed:
- Concrete mix
- Water
- Shovel
- Level
- Support beams or braces
Step-by-Step Fixing Process:
Dig Around the Post: Dig around the base of the leaning fence post to expose the concrete footing. Clear away dirt and debris to ensure a clean working area.
Mix and Pour Concrete: Prepare concrete mix according to package instructions. Pour the mixed concrete around the base of the post, filling the hole until it reaches ground level. Use a shovel to evenly distribute the concrete.
Check Alignment: Use a level to ensure the fence post is straight and aligned properly. Adjust as necessary before the concrete sets.
Support and Brace: While the concrete is setting, use support beams or braces to keep the post in position until the concrete has fully cured. This typically takes around 24 to 48 hours depending on weather conditions.
Remove Braces: Once the concrete has cured, remove the support beams or braces and backfill any remaining gaps with soil.
How to Fix a Fence Post in the Ground
Materials Needed:
- Post hole digger
- New fence post
- Concrete mix
- Gravel
- Water
- Level
Step-by-Step Fixing Process:
Remove the Damaged Post: Use a post hole digger to carefully remove the damaged fence post from the ground. Clear away any debris or old concrete to prepare for the new post.
Prepare the Hole: Dig a new hole for the replacement post, ensuring it is deep enough to support the height of the fence and stable enough to withstand environmental factors.
Set the New Post: Place the new fence post into the hole and use a level to ensure it is perfectly upright. Backfill the hole with gravel for drainage, leaving enough space at the top for the concrete.
Mix and Pour Concrete: Prepare the concrete mix and pour it into the hole around the new post. Ensure the post remains level and straight during this process.
Allow to Cure: Let the concrete cure fully before attaching the fence panels. This may take a few days depending on weather conditions.
Fixing a broken or leaning fence post doesn't have to be a daunting task. By following these detailed steps and using the right materials, you can ensure your fence remains strong and secure for years to come. Regular maintenance and inspections are key to preserving the integrity of your fence and avoiding costly repairs in the future.
Understanding Fence Post Repair Needs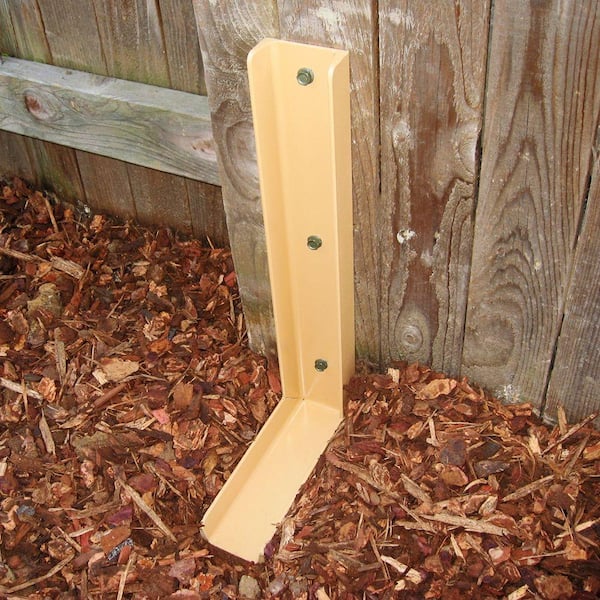
Before diving into the repair process, it's essential to assess the damage to your fence post accurately. Common issues include:
- Rotting: Often caused by prolonged exposure to moisture.
- Damage: From accidental impact or natural wear and tear.
- Instability: Due to improper installation or aging.
Each of these issues requires a specific approach to ensure a lasting repair.
Essential Tools and Materials
To begin your fence post repair project, gather the following tools and materials:
- Post hole digger: For excavating around the damaged post.
- Concrete: Necessary for setting new posts securely.
- Level and measuring tape: Ensures proper alignment and dimensions.
- Replacement post: Depending on the damage, you may need a new post.
- Support brackets or spikes: Depending on the chosen repair method.
- Safety gear: Gloves, goggles, and appropriate clothing for protection.
Methods for Fence Post Repair
Using Fence Post Repair Brackets
Fence post repair brackets are ideal for reinforcing weak or leaning fence posts without the need for digging up the existing post. Here’s how to proceed:
Assessment: Identify the extent of the damage and ensure the bracket is suitable for the post size.
Installation: Attach the brackets securely to the post using screws or nails, ensuring they are positioned to provide maximum support.
Stabilization: Once installed, the bracket will support the post, preventing further leaning or movement.
Repairing with Concrete Spikes
Fence post repair spikes offer a quick solution for stabilizing posts in concrete without the need for extensive digging:
Preparation: Clean around the base of the post and ensure the spike is aligned for proper support.
Driving the Spike: Use a sledgehammer to drive the spike into the ground until it is firmly in place, stabilizing the post.
Securing the Post: The spike will anchor the post securely, providing immediate stability.
Utilizing Fence Post Repair Kits
Fence post repair kits such as the Wocepu 2.8 ft kit provide comprehensive solutions including support brackets and tools tailored for easy installation:
Assembly: Follow the kit instructions to assemble components and prepare for installation.
Installation: Secure brackets or spikes as per the kit guidelines, ensuring a sturdy repair.
Completion: Once installed, the post will regain stability and structural integrity.
Advanced Techniques: Replacing Fence Posts
In cases where fence post replacement without removing the fence is necessary due to severe damage or rot, follow these steps:
Cutting the Post: Use a saw to cut through the damaged post above ground level, ensuring a clean cut.
Excavation: Dig around the existing concrete base to expose it fully, allowing for removal.
Setting the New Post: Place the new post in the excavated hole, ensuring it is plumb and level.
Concrete Placement: Pour new concrete around the post to secure it firmly in place.
Final Adjustment: Allow the concrete to cure as per manufacturer's instructions before attaching fence panels.
By following these detailed steps and methods, you can effectively address various fence post repair needs, from minor stabilizations to complete replacements. Regular maintenance and prompt repairs ensure the longevity and stability of your fence, enhancing the overall appeal and value of your property.
When dealing with a broken fence post, it's essential to understand the best methods for repair to ensure your fence remains sturdy and secure. Here’s a comprehensive guide to help you tackle this DIY project effectively.
Introduction to Fence Post Repair Techniques
Repairing a wooden privacy fence post becomes necessary when damage occurs due to various reasons such as windstorms, rot, or improper installation. Instead of replacing the entire fence, which can be costly and time-consuming, repairing the post itself can often solve the problem efficiently.
Assessing the Damage
The first step in repairing a broken fence post is to assess the extent of the damage. This involves checking how much of the post is still intact above the ground and evaluating the stability of the surrounding structure.
Tools and Materials Needed
To repair a wooden privacy fence post, gather the following tools and materials:
- Stur-D Fence Post Brackets: These brackets are designed specifically for quick and easy repairs of leaning or broken fence posts.
- Concrete mix and trowel: Essential for stabilizing the repaired post.
- Drill and screws: To secure the brackets and any additional support.
Steps to Repairing a Wooden Fence Post
Assessment and Preparation: Start by examining the damaged post and clearing the area around it.
Installing Stur-D Fence Post Brackets: Attach the brackets to the damaged post using screws and ensure they are firmly in place.
Adding Support: If the post is severely damaged, consider adding additional support with braces or supports installed adjacent to the post.
Concrete Stabilization: Mix concrete according to package instructions and fill it around the base of the repaired post to provide stability.
Finishing Touches: Once the concrete sets, inspect the repair and make any necessary adjustments. Paint or stain the repaired area to match the rest of the fence for a seamless look.
Benefits of Using Stur-D Fence Post Brackets
Stur-D Fence Post Brackets offer several advantages:
- They are quick to install, reducing repair time significantly.
- Brackets are durable and provide strong support, ensuring long-term stability.
- They are versatile and can be used for various types of fence posts, including those embedded in concrete.
Conclusion
Repairing a broken wooden privacy fence post doesn't have to be daunting. With the right tools and materials, such as Stur-D Fence Post Brackets and concrete mix, you can restore the stability and functionality of your fence quickly and effectively. By following these steps, you'll save time and money while ensuring your fence continues to provide privacy and security for years to come.